STYLISH DRESS BOOK 2 : DRESS "V"
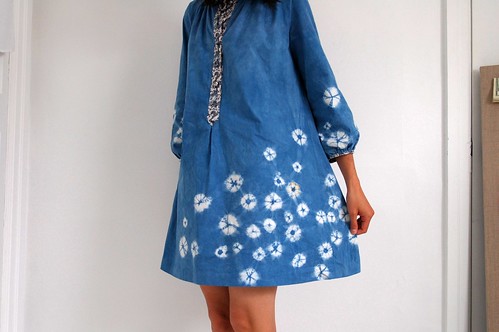
Here it is, my indigo-dyed, shibori dress. I’m so in love with it.
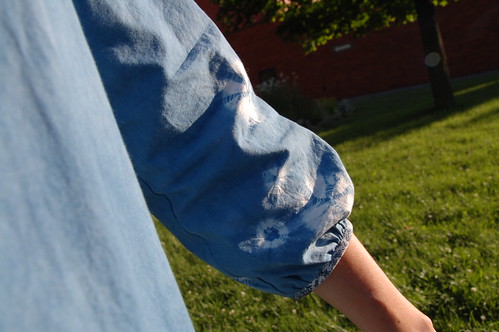
When choosing the pattern for this project, I wanted to choose a fairly simple dress that had sleeves to show off the shibori pattern. Rather than try to cover the entire dress with the pattern, I focused on having it clustered around the bottom of all the pieces. To get the specific placement, I cut out all my pattern pieces out of white muslin, serged all the edges and did the shibori right on each dress piece.
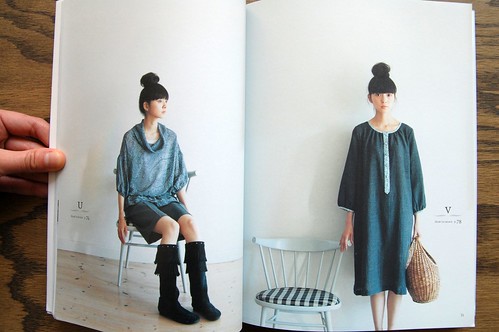
The pattern is dress “V” from Stylish Dress Book 2. This is actually the first dress I’ve made from this book. I’m just finishing off a second one this week. Melinda made this particular dress a few months ago, so I already knew how cute it was. Choosing the contrasting fabric to go with it was difficult. I’m pretty sure I pulled every navy bolt of fabric off the shelf before finally settling on this floral print from Windham. I also made fabric covered buttons using this fabric for the placket. Having matching buttons always makes a project feel polished.
This dress was simple to make. It has lots of pretty gathering on the neckline and sleeves. I did mess up one part though. I failed to add seam allowance to the placket down the centre, so I had an extra big hole down the centre of the dress. To fix it, I just created a little centre pleat below the placket which brought together the edges of the placket hole. Mistakes often lead to creative solutions, so I always try to avoid getting too upset when I realize that I’ve done something ‘wrong’.
This is my favourite dress so far. I’m really, really proud of it. I definitely want to keep experimenting with natural dyeing fabrics to make more clothing. The soft, uneven texture looks so beautiful. I even have the beginnings of an idea to do a quilt with only natural dyed fabrics.


36 comments
Love everything about it!
amazing!
I can hardly wait to see it in person tomorrow.
you are so talented.
It is so lovely Karyn! The colours and design are just perfect!
A real inspiration.
i’m crushing on your dress and you should be very very proud. the question is whatever will you wear when you take it off?
it’s beautiful!
Gorgeous! I just ordered the book; couldn’t resist. This is also further confirmation that you can wear ANYTHING, girl. It looks a million times better on you than on the model!
This is lovely.
All of this is really impressive! I understand why you like this dress so much! 🙂
Wear it on Thursday!!
After following your blog for about a month I finally had the chance to visit the workroom on Saturday (and I noticed you in this dress, the shibori is fantastic and the style very cute. I love that you shortened it, makes it feel much lighter and summery). The workroom was every bit as wonderful as I had imagined. I left feeling very inspired. I wish I was living in Toronto (fingers crossed by the end of the year) so I could visit more regularly and take some of the classes. Being new to Canada your blog has helped me to find a lot of great Canadian resources and inspiration.
A friend has just sent me both Stylish Dress Books and I can’t wait to get started on a few. Hopefully I can adjust them to fit over this growing belly of mine without too much difficulty. Now I just have to find some stretch lace to start on a nice new pair of undies!
This is really beautiful. I look SO forward to your dress posts! I can’t wait to try this shibori thing….gosh I love that dress!
Love, love, love your work!
oh so lovely! such amazing photos and wonderful things to see!
Ohhh this is so lovely… wow the colour you chose is so tranquil and perfect.
So pretty Karyn. I agree with Anabela, way more gorgeous on you. And I love your mistake, great little detail.
the dress is just beautiful! love the colous and the pattern 🙂
Wow, love this dress! I like how you shortened it too, much cuter above the knee.
Stunning. Absolutely beautiful.
I made the same mistake with the placket when I made this dress! I actually like the way it looks with the tiny pleat. I think it adds a sweet detail to the front. I can’t get over how pretty that colour turned out. I love shibori, but I think this is some of the best use of it I’ve ever seen. xo!
fabulous dress karyn! so glad you put the shibori to such good use. makes me want to get the dyepots out again….
um. dying.
this one is RIGHT up my alley.
i forgot to tell you how wonderful the dress looked! 🙂
Sigh… That is one of the prettiest dresses I’ve ever seen.
Quelle jolie robe !
I love how you placed the shibori designs along the bottom of the dress.
I was trying so hard not to buy this book, you are ruining my efforts !
This dress is just gorgeous. Perfect choice of contrast fabric! Your blog really inspires me. Thanks.
That is lovely! Your pattern placement is very well-done. I love shibori dyeing. If you are interested, here is a shibori jacket that I made last year:
http://couturedetails.blogspot.com/2008/05/tie-dye-jacket.html
Hi! I love the shibori dress, I’ve got this stylish dress book and am figuring out the pattern for dress “F”, but I couldn’t find any seam allowance measurement for the sides and neckline, only the hem. What number did you use?
Hi Bea – for those seam allowances you can use anything you want… i usually do 1/2″ for any seam allowance that is not indicated on the pattern instructions.
oh my oh my, this is just gorgeous! I’m so fed up with not being able to go shopping for beautiful thing, this inspires me to get making some! Thanks
I am in awe of this dress, it is just so lovely!
I love the dress. LOVE it.
I like your shibori dress very lovely.The design,color they are just perfect.
Hi, I know you made this ages ago however I’ve only just bought the book and looking at yours compared to the book I can not tell if you widened it at the bottom when you shortened. Can you please tell me if you did actually widen the bottom to a more A line shape? I am really eager to cut mine
Thanks so much
Karla