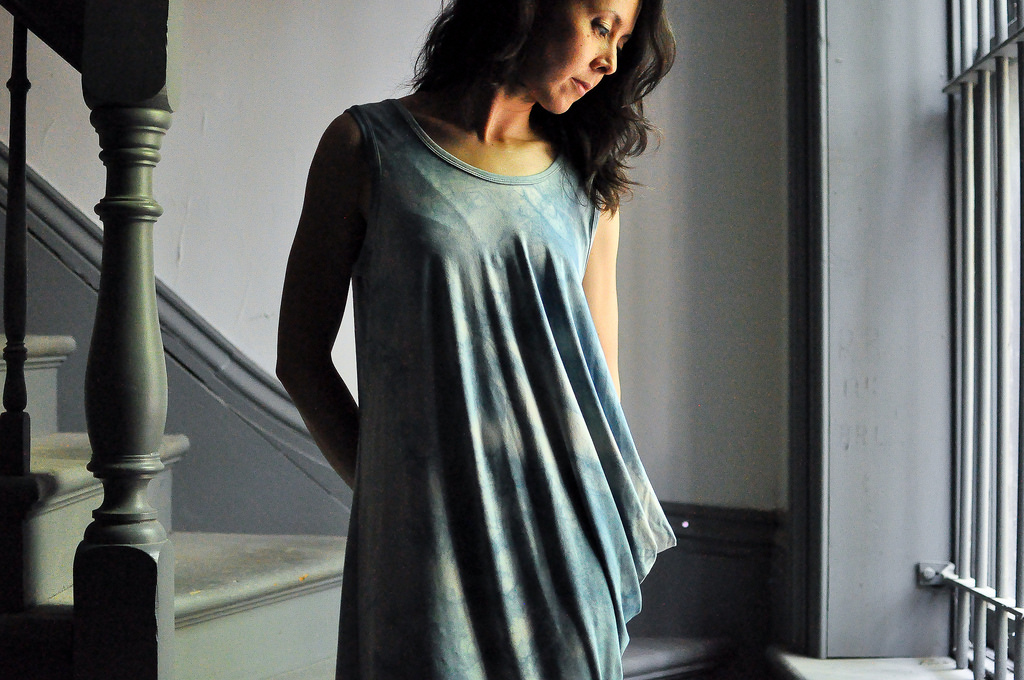
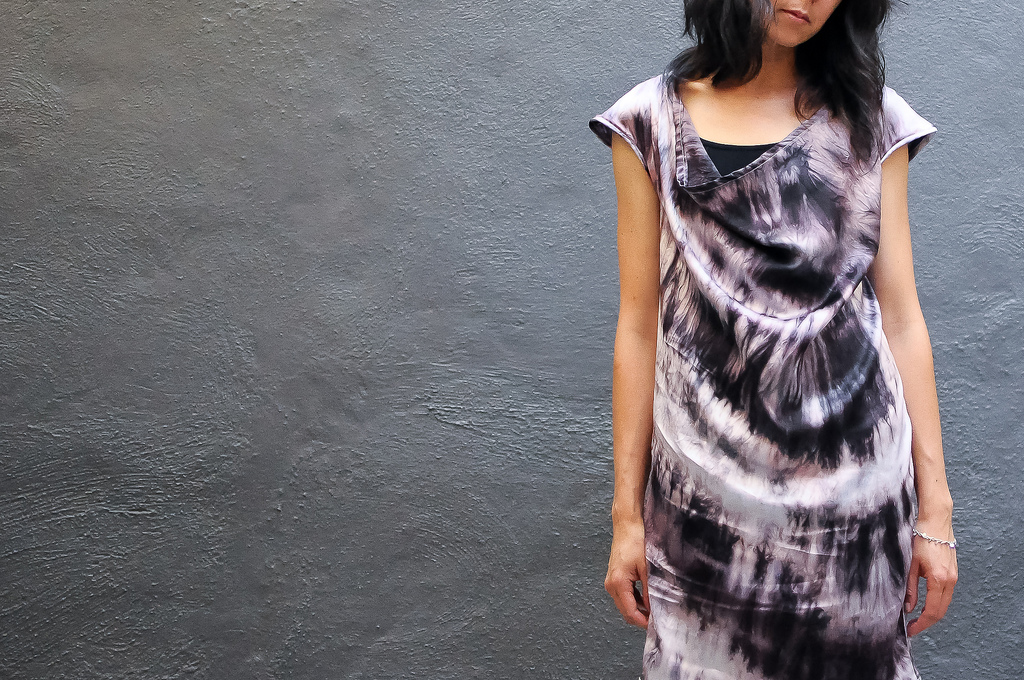
Tag Archive for 'shibori'

MANNISH STYLE : DRESS 12

Mannish Style : Dress 12

Mannish Style – available at the workroom
Dress 12 : silk shibori dyed in logwood

Oh boy, was I ever excited last week when I remembered that I had this piece of silk from my Advanced Natural Dyeing class. This pattern from Mannish Style is exactly what I had hoped to find to make a dress from this shibori fabric that I dyed in logwood. I love the drapey folds.

This pattern was also very easy! There are just 2 pieces (front & back), with the front being cut on the bias to give it that nice drape. The neck and arms are finished with bias trim. The pattern was intended for a knit fabric which you can see would have even more drape. Because of that, the dress is a bit snug around the hips and I would adjust the pattern next time to be a bit looser.  I would also love to make this in a fun knit fabric.

This silk is my most favourite piece of fabric that I have dyed myself. The super dark, inky purple colour we got from this logwood bath is so amazing and so much deeper than any other colour I’ve done in the past. There is still some of this silk leftover and I want to try to use every bit of it. I’m trying to figure out what else I can make with it, perhaps a tank top or camisole?

Mannish Style : Dress 12

Mannish Style : Dress 12

Mannish Style : Dress 12

Mannish Style : Dress 12

Share

NATURAL DYEING AT JULIE’S

Advanced Natural Dyeing Reunion

Thursday night, Julie hosted a fun backyard dyeing party for the students from the Advanced Natural Dyeing class. During the class we weren’t able to get the zinc lime indigo vat going properly, so Julie offered to have us over when she got one going successfully at home.

It was the perfect night to be outside eating fresh baked bread and cheese, drinking iced tea and experimenting with indigo. There were two indigo vats that Julie had going. One was a zinc lime indigo vat (you can see the ‘flower’ below that forms on top of the vat when it is ready for dyeing) and the other was a natural fermentation vat. We found the natural fermentation vat to be deeper in colour and I felt like I could try to do this type of indigo vat on my own. It was pretty exciting to try out other types of indigo. What is it about indigo blue?

I did some Itajime Shibori, which is created by simply folding and clamping your fabric. It’s so simple, but the results are stunning. I’m really happy with how my square window panes turned out and it was my first time trying to do triangular folds. I’m not too sure what I’m doing with these indigo pieces but I’m sure you’ll see them re-appear in another form in the future.

We also set up a pot of cochineal with lime juice, which seems to give some brilliant red results to the yarns that Susan and Julie were dyeing. We tried mixing cochineal and log wood into another pot and got a pretty purplish colour.

I over-dyed a few pieces that will go into my natural dyed quilt. I think I’m ready to assemble the quilt top and back. I can’t wait to see how all these dyed samples look together.

We stayed outside dyeing and chatting until it got too dark to see what we were doing and the mosquitos started to bite. We missed Carolanne and Margie that night, who couldn’t make it, but we talked about another get together since we had so much fun.

We ended the night with a raspberry pie that I got at Mabel’s on Roncesvalles. YUM. I’m plotting going back for another one that I might try to eat all by myself.

Check out Arounna’s photos here and Julie’s photos here. The top photo in this post is by Brian who took some great shots while I was unfolding my fabric.

p.s. Julie opened up a little shop on etsy to sell some limited run natural dyed accessories and yarns!

Advanced Natural Dyeing Reunion

Advanced Natural Dyeing Reunion

Advanced Natural Dyeing Reunion

Advanced Natural Dyeing Reunion

Advanced Natural Dyeing Reunion

Advanced Natural Dyeing Reunion

Advanced Natural Dyeing Reunion

Advanced Natural Dyeing Reunion

Advanced Natural Dyeing Reunion

Advanced Natural Dyeing Reunion

Advanced Natural Dyeing Reunion

Advanced Natural Dyeing Reunion

Advanced Natural Dyeing Reunion

Share

ADVANCED NATURAL DYEING

Solar Dyeing

One of our many new classes is an Advanced Natural Dyeing class. Many of the past Natural Dyeing students wanted a next level class where they could explore more dyestuffs and different techniques. Also, we just love taking classes from Julie. The advanced class is completely self directed, so each student has their own personal projects and develops a plan with Julie ahead of time.

Natural dyeing is really exciting. I love when the back area and kitchen of the workroom changes into a laboratory with pots everywhere that are bubbling up with bundles of fabric inside. It’s messy and chaotic and thrilling. Also, dyeing with a group of people is so much fun.

I had two projects that I wanted to work on. The first was a very simple natural dyed quilt. I took some organic cotton brushed sheeting and randomly cut it into pieces that I dyed and over-dyed into various colours. My plan is to simply stitch all the pieces back together to create a front and back of a quilt. I’ve kept pretty good notes on what each piece was dyed in, so the quilt will be a bit of a map of all the dyeing I did in class.

My second project was to dye a piece of silk for a dress. I’ve been pinning all kinds of inspirational dyeing images on Pinterest. In particular, I really loved this super dark, inky dress and wanted to try to replicate that depth of colour. A lot of the natural dye colours end up being very soft and muted, so I thought I would have to do some over-dyeing to build up that kind of colour. By accident, I ended up creating a very dark logwood bath using an older bundle of logwood chips that had been previously used and I had kept for the past few months in a plastic bag. I think something about the wood staying wet for so long, released a lot of colour into the bath and we got a purple that was almost black. There are so many great surprises in natural dyeing. I twisted up and tied my bundle of silk and cooked it carefully in the bath for a while. I’m so happy with how it turned out in the end and love the shibori pattern it created.

Arounna made all kinds of lovely scarves and bags from her class work. Margie had all kinds of shibori, yarn and even her beautiful crochet stones dipped into the pots. Carolanne was working on an indigo shibori dyed piece of washi paper that she is hand quilting. Brian was working on creating fabric samples to make quilt blocks from. Susan did some fun solar dyeing, yarn and shibori experiments. Even Julie bundled up some fabric during class for solar dyeing. We had such a great time in class together and I think there will have to be a little dye party reunion during the summer. I want to do more dyeing!

Arounna's mordanted fabric

Dye samples

Karyn's Dye Samples for a Quilt

Karyn's Logwood Shibori on Silk

Margie's Dyed Yarn + Crochet Stone

Share

STYLISH DRESS BOOK 2 : DRESS "V"

Here it is, my indigo-dyed, shibori dress. I’m so in love with it.

When choosing the pattern for this project, I wanted to choose a fairly simple dress that had sleeves to show off the shibori pattern. Rather than try to cover the entire dress with the pattern, I focused on having it clustered around the bottom of all the pieces. To get the specific placement, I cut out all my pattern pieces out of white muslin, serged all the edges and did the shibori right on each dress piece.

The pattern is dress “V” from Stylish Dress Book 2. This is actually the first dress I’ve made from this book. I’m just finishing off a second one this week. Melinda made this particular dress a few months ago, so I already knew how cute it was. Choosing the contrasting fabric to go with it was difficult. I’m pretty sure I pulled every navy bolt of fabric off the shelf before finally settling on this floral print from Windham. I also made fabric covered buttons using this fabric for the placket. Having matching buttons always makes a project feel polished.

This dress was simple to make. It has lots of pretty gathering on the neckline and sleeves. I did mess up one part though. I failed to add seam allowance to the placket down the centre, so I had an extra big hole down the centre of the dress. To fix it, I just created a little centre pleat below the placket which brought together the edges of the placket hole. Mistakes often lead to creative solutions, so I always try to avoid getting too upset when I realize that I’ve done something ‘wrong’.

This is my favourite dress so far. I’m really, really proud of it. I definitely want to keep experimenting with natural dyeing fabrics to make more clothing. The soft, uneven texture looks so beautiful. I even have the beginnings of an idea to do a quilt with only natural dyed fabrics.

Share

INDIGO DYEING & SHIBORI

The last day of the Natural Dyeing class was all about indigo dyeing. I’ve always admired Japanese shibori dyeing, so I couldn’t wait to try it out in this class. Shibori is a method of creating patterns on fabric during the dyeing process by binding, stitching, folding, twisting, or compressing it.

I got the idea to dye fabric for a dress from Melissa and pre-cut and serged all my pieces beforehand. This way I could plan exactly where the shibori would be located on the dress. I used a pure white muslin rather than a natural coloured one to keep the blue clearer. To create my design I placed screws (of various sizes and shapes) underneath my fabric and wrapped each one up tightly with heavy upholstery thread. This is a fairly labour intensive type of shibori, but I really liked the circular patterns it creates.

Deeper blue colours are achieved through repeated immersion into the dye vat. I was able to dip my pieces into the vat four times. It’s a bit hard to tell what the colour will dry as, it is always much darker when it’s wet. When I unwrapped all the screws, several of them had transferred rust marks onto the fabric which I actually really like. The fabric dried to a really nice blue and I even like the slightly uneven colouring, it gives it a vintage feel.

Shibori tights? Yes, please!

Next post – the finished dress!

Share