QUILT BASTING
This weekend was Quilt Sunday and I had a mission to get my Queen-sized quilt basted. Of course, I enlisted the help of the workroom’s quilt master, Johanna. How lucky am I to have a quilt master to call upon in times like these?
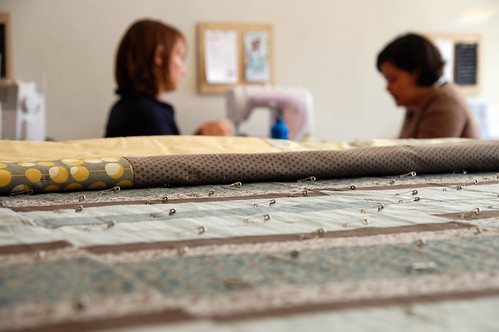
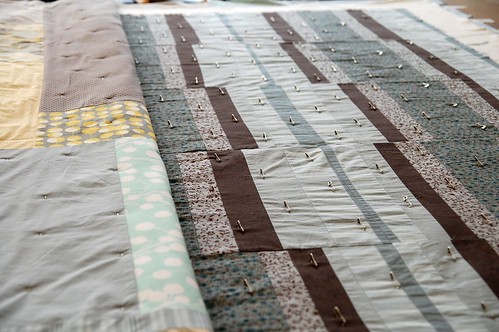
Basting is the crucial step before proceeding to quilting all the layers of a quilt together. Basting a huge quilt is no easy task and my quilt was even larger than the workroom’s largest cutting table. We positioned the quilt back face up and with the sides edges on the table and the ends hanging off. The sides were taped down with masking tape to hold the backing taut. A large piece of cotton batting was laid on top and carefully smoothed out. The quilt top was layered next with the face up and then we started pinning. Curved basting pins are the best to use for this and we used a LOT of them. Over 950 curved basting pins placed approximately every four inches. The edges were thread basted, as a final step. Basting is important because it keeps the three layers (quilt top, batting, quilt back) from shifting as you do your quilting. I’m planning on hand quilting this mammoth quilt. I’m just going to be doing vertical lines of stitching, evenly spaced. Sounds easy enough. I have no idea how long that part will take me, but I’ll be reporting on my progress.
I have a couple fun projects on the go that are keeping me busy (busier than usual), but I’ll be done them soon and of course sharing them with you.
NOTES: I realize that not everyone out there is into quilting, so some of this talk can be confusing. Here are a few brief definitions if you’re trying to follow along:
PATCHWORK or PIECED WORK: Sewing together pieces of fabric into a larger design.
BASTING: Sewing with long loose stitches to hold material together. When basting a quilt, this is the step once you have all three layers of your quilt ready to put together. Basting can be done with thread, curved basting pins or a combination of both.
QUILTING: Sewing through two or more layers of material to attach them together, after you have basted them. This can be done on a sewing machine, longarm quilting system or by hand. The quilting can be done in a pattern or follow the patchwork lines.
6 comments
yay you’ve updated your blog!
so much work goes into a quilt! it is definitely a labor of love.
why do you use safety pins?
ps: i also noticed that you got a new camera 😉
Quilting is almost a lost art. There is so much work involved but the results are often well worth the effort. Good luck with your project and I look forward to seeing how you make out with it.
WOW. 950! I wish I had been there to help, after all the help you gave me! (I was at my volunteer shift at the Bot. Garden library, cataloguing children’s books — basting is way more satisfying!)
I cannot wait to see it finished.
Hey – are you going to be selling some of these curved pins at the shop?
Gah – I was so bummed that I had to run on Sunday, I had so many obligations! This coming Sunday I have a dogsitter, I’m so happy!
Beautiful work there – that quilt is a huge undertaking. Look forward to seeing the completed result.
Also, I have just loved all the dresses you’ve made!
I just gave you a wee award over on my blog…if you’re interested (blush)
melissa – you have the eyes of a hawk. i love my new camera! the safety pins are used to baste all the layers of the quilt together so that they don’t shift when i do the quilting part.
jennifer – thanks for visiting. there’s a heck of a lot of work involved with quilting and i’ve still got so far to go!
anabela – i can’t believe how many pins we used. hopefully now i’m set for life with basting pins. i don’t imagine i’ll ever do anything larger than a queen sized quilt. i’m dying to finish, wash it and lay it on my bed… it might be a while though.
angelune – i do sell the curved basting pins here already. they are a MUST. i’m so happy you got a dog sitter for sunday. can’t wait to start making our upholstered cubes on sunday!
docwitch – oh my! how sweet of you. thank you for the award and for reading about my little projects.