TWINKLE BLACKBOARD
I’m asking you to use a bit of your imagination for this one.
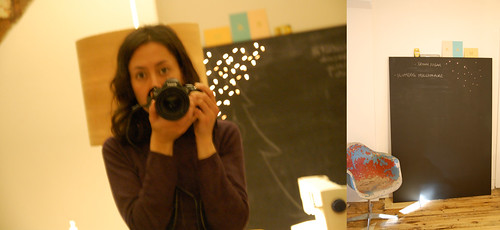
I’ve been trying to photographically capture the magic of my homemade blackboard with very little luck over the last month. I will do my best to describe it and perhaps you can envision it in your mind’s eye.
This project was done a couple years ago, but since I mentioned it the other day, I’ve been wanting to share it with you. I had originally imagined having a huge blackboard hanging in the dining room. Rather than just painting blackboard paint directly on the wall, I wanted it to be an actual hanging piece. I walked around the corner to the lumber yard (which has sadly since moved away) and requested their thickest MDF, cut down to 6′ x 4′. I chose MDF because of its super smooth surface, normally I’m not a fan. Of course, it hadn’t occurred to me just how heavy this thick piece of lumber would be. Luckily, the lumber yard fellows had more common sense than I and lent me their large dolly to shuttle my heavy load home. Luckily, one of them also followed me home to help heave it up the steps of the porch. I have a long history of lugging heavy things around town.
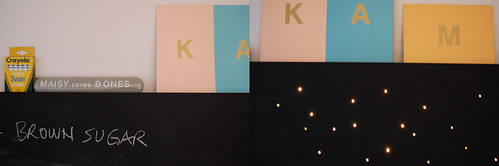
The huge board was painted with a few coats of black chalkboard paint and then I quickly realized that it was way too heavy to just hang on a wall. Thus, the blackboard simply leans against the wall. If you attempt this project, I highly recommend doing a smaller, more manageable size and forgoing thickness for thinness. I bought a tiny set of twinkle lights from Urban Outfitters and Andrew drilled a series of holes in the blackboard in a random constellation pattern along the top right corner. The holes were then painted in with the black paint. The lights were wired along the back of the blackboard and secured in each hole. Voila! A lovely twinkling night sky in our dining room, upon which we can write our grocery list, draw our Christmas tree and remind ourselves which movies we want to rent next. I wish you could see it in person, my photos don’t capture its charm.
I must wish dear Charlotte, ‘Bon Voyage!’, as she leaves us to go home to New Zealand today. You will be terribly missed around the workroom! Please eat a package of Tim Tams for me upon your arrival.
{NOTE : The type canvases that sit on top of the black board were done by Andrew using Letraset rub on letters. Clever Melinda figured out that they represent our intitials – Karyn, Andrew & Maisy.}

31 comments
First, we will miss you Charlotte!!! I hope we’ll see you again soon . . .
Second, that chalkboard is fabulous! I know I see you all the time, but your craftiness still amazes me Karyn.
LOVE this idea! It looks great – no imagination needed 🙂
Super cool! I painted one of my walls with green chalkboard paint in high school, and it was awesome. My little sister has that room now, and she repainted everything else I did, but kept the chalk! In fact, some of the things I wrote in hs are still on it. I love chalkboard paint!
Your twinkle lights are adorable!
How sad that Charlotte is leaving us 🙁 I hope she travels safely and that she keeps in touch. She is one crafty woman (and super sweet too).
The blackboard is…AWESOME!!!! It looks so fantastic. I love the addition of the lights. I am so inspired by this that on my way home tonight I might just stop by the lumber yard and paint store and give this project a whirl.
Thank you for the inspiration
karyn! this is sooooo adorable! i love it! you’re so creative! i waaaaaaaant one!
You amaze me Karyn! this is cooler than any chalkboard I have ever seen!
Wow! I was thinking of doing something similar. I bought some pegboard that I wanted to paint a dark color then backlight it, but I hadn’t yet figure out how I was going to do the lighting. You are lucky to have an Andrew to help you execute your crafty schemes! Kudos!
i see it!!! so awesome!! i totally agree with everyone here, u’ve got skills! 🙂
it’s lovely!
It took me a minute to realize that your letters are for you, Andrew and Maisy! So cute! I love this project.
I love the twinkle lights! What an amazing idea.
lovely idea…my favorite blackboard diy for sure!
i would mention that when painting MDF it is best to prime it with an oil or alcohol based primer first. MDF is very porous by nature… it will absorb the water from latex paint and warp over time (esp. large sized pieces).
Whoo hoo!!! LOVE, LOVE it! One question… if I did want to hang it, what type of board would you recommend using for smooth-ness and light-ness? Also, how did you secure your lights in the holes on the backside? Are they taped or wires stapled over or something, so they don’t fall out?
I love your blog and had added it to my list of links!
Amanda
love love love this …
An idea to still get the thickness desired, but keep it light would be to use a thinner version of the same material, then make a frame on the back so it appears thicker, but doesn’t have all the excess material to add weight.
As a Kiwi who has recently moved to America – I miss Tim Tams alot.
Good news is you can buy them from World Market Stores. Next time your down in America, find a store and pick some up
http://www.worldmarket.com/Eat–Drink/Eat/Cookies–Cakes/Arnotts-Biscuits/lev/4/productId/4726/Ne/1100001/sectionId/3200/N/1100414/categoryId/1100414/pCategoryId/1100405/gpCategoryId/1100404/Ns/TOP_SELLER_INDEX|1||CATEGORY_SEQ_3207|0/index.pro
I love this. You’re a genius! I’m definitely going to do some chalkboard project soon, thanks for sharing your masterpiece.
Cute stuff Karyn!
Amazing idea! I would like to try it out!
Thanks for sharing ^^
Are the twinkle lights like christmas lights?
Yeah, I have the same question about twinkle lights being the same as Christmast lights. I checked the UO site for all lights and didn’t see anything similar.
Hi Rachel & Jen – the twinkle lights are just tiny little christmas lights. I’m sure you could use any size, but the tiny ones will be easier to install behind your blackboard.
Amanda – we made the holes as big as the lights, so they stay in pretty well. All the wiring at the back creates a bit of bulk, so if you’re going to hang your board, you’ll want to find a way to mount it slightly away from the wall. also – the mdf comes in many different thicknesses, just use a thinner board. I’ve made a black board out of plywood too, but it’s just more rough. hope this helps!
they is super, I will do it to my daughter, thank you!!!!
beautiful idea!!!
alexandra
oooh this is totally gorgeous. Ijust stumbled across your blog whilst looking for a japanese dress book and I’m so glad i did as it’s fab!! Be back soon M x
Oh my.. I really like the twinkle blackboard. My son is doing a project for science and this would add so much pizazz. It’s totally necessary! And there are so many uses for it when he’s done. Kudos.
-Molly
Antique Jewelry
Hey! I just read the post on D*S and photo of your amazing chalkboard was there… It look amazing! Thank you for sharing, x
Love this! I wanted to paint a wall in our new kitchen with blackboard paint but my husband refused (which is odd considering I painted a wall in our son’s old bedroom with the paint and he loved it). Maybe this will be my creative alternative! Thanks for the lighting idea!!